2023. 6. 22. 15:23ㆍ- 디자인 패턴
MVP패턴은 Model - View - Presenter로 이루어진 패턴 입니다.
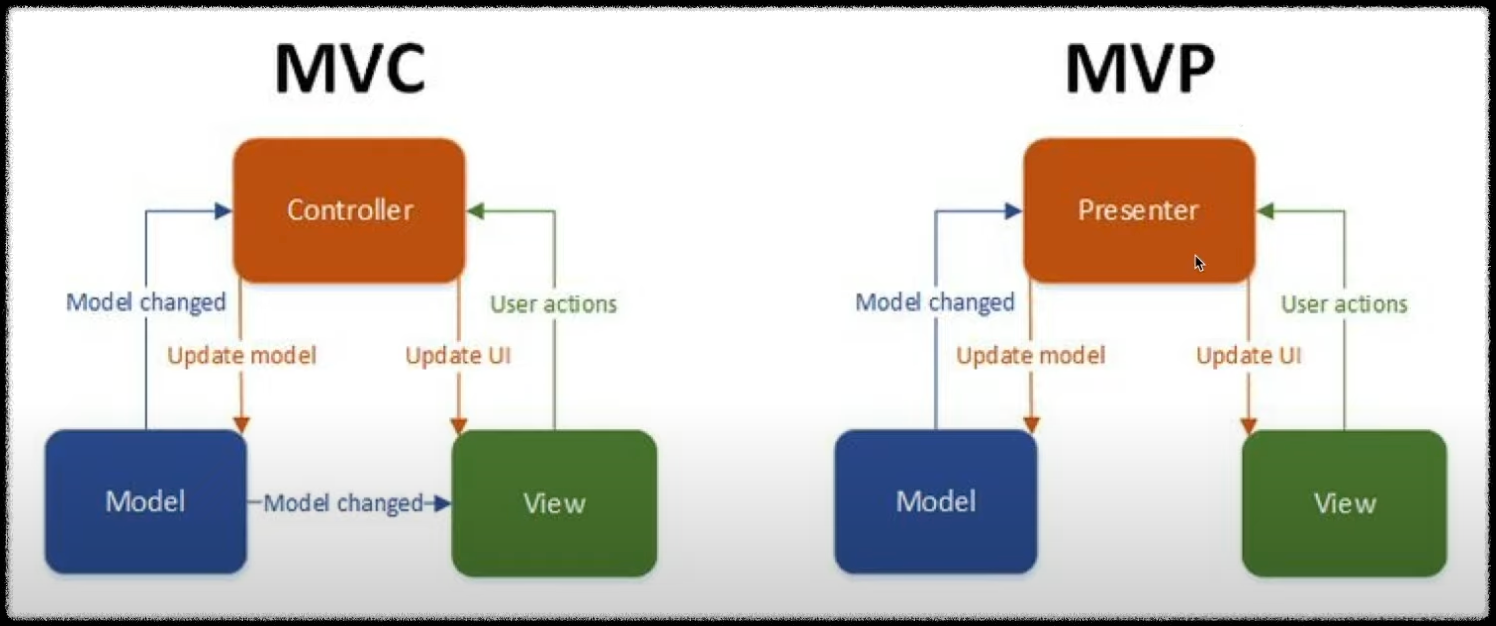
MVP는 Model 데이터 변경이나 View ui를 변경 할때 Presenter를 통하여 변경이 가능합니다. MVC와 다른 가장큰 특징으로는 Model이 View를 변경 하지 못한다는 차이가 있습니다.

mvc와는 다르게 mvp에서는 interface가 존재 하는 구조로 되어 있습니다.
Controller(Activity)는 Presenter에게 모든 권한을 넘겨 주고 Interface를 상속받아 정보만 입력을 받는 역할을 하게 됩니다.
Presenter안에 있는 View와 Model을 Presenter를 통해서만 변경이 가능하고 Model이 View를 직접적으로 변경하지 못합니다.
MVP의 장점으로는 비슷한 Activity가 생겼을때 Presenter를 이식하여 재사용 할 수 있어 편리함이 있습니다.
이론 적인 내용 말고 아래에 코드를 적용하여 예시를 들어보겠습니다.
view(activity_main)를 만들어줍니다.
activity_main
<?xml version="1.0" encoding="utf-8"?>
<layout xmlns:android="http://schemas.android.com/apk/res/android"
    xmlns:app="http://schemas.android.com/apk/res-auto"
    xmlns:tools="http://schemas.android.com/tools">

    <data>
        <variable name="activity" type="com.example.howlmvvm.MainActivity" />
    </data>

    <LinearLayout
        android:layout_width="match_parent"
        android:layout_height="match_parent"
        android:gravity="center"
        android:orientation="vertical"
        tools:context=".MainActivity">

        <GridLayout
            android:id="@+id/buttonGrid"
            android:layout_width="wrap_content"
            android:layout_height="wrap_content"
            android:columnCount="3"
            android:rowCount="3">

            <androidx.appcompat.widget.AppCompatButton
                android:layout_width="100dp"
                android:layout_height="100dp"
                android:onClick="@{() -> activity.clickNumber(1)}"
                android:text="1" />

            <androidx.appcompat.widget.AppCompatButton
                android:text="2"
                android:layout_width="100dp"
                android:onClick="@{(view) -> activity.clickNumber(2)}"
                android:layout_height="100dp" />

            <androidx.appcompat.widget.AppCompatButton
                android:layout_width="100dp"
                android:layout_height="100dp"
                android:onClick="@{() -> activity.clickNumber(3)}"
                android:text="3" />

            <androidx.appcompat.widget.AppCompatButton
                android:layout_width="100dp"
                android:layout_height="100dp"
                android:onClick="@{() -> activity.clickNumber(4)}"
                android:text="4" />

            <androidx.appcompat.widget.AppCompatButton
                android:layout_width="100dp"
                android:layout_height="100dp"
                android:onClick="@{() -> activity.clickNumber(5)}"
                android:text="5" />

            <androidx.appcompat.widget.AppCompatButton
                android:layout_width="100dp"
                android:layout_height="100dp"
                android:onClick="@{() -> activity.clickNumber(6)}"
                android:text="6" />

            <androidx.appcompat.widget.AppCompatButton
                android:layout_width="100dp"
                android:layout_height="100dp"
                android:onClick="@{() -> activity.clickNumber(7)}"
                android:text="7" />

            <androidx.appcompat.widget.AppCompatButton
                android:layout_width="100dp"
                android:layout_height="100dp"
                android:onClick="@{() -> activity.clickNumber(8)}"
                android:text="8" />

            <androidx.appcompat.widget.AppCompatButton
                android:layout_width="100dp"
                android:layout_height="100dp"
                android:onClick="@{() -> activity.clickNumber(9)}"
                android:text="9" />

        </GridLayout>

        <TextView
            android:visibility="invisible"
            android:id="@+id/message_success"
            android:layout_marginTop="30dp"
            android:layout_width="wrap_content"
            android:layout_height="wrap_content"
            android:text="비밀번호 언락 성공" />

    </LinearLayout>
</layout>
그 다음은 ViewInterface라는 Interface를 만들어 줍니다.
ViewInterface
interface ViewInterface {
    fun toastMessage(i : Int){}   // 토스 메세지를 띄우는 메소드, 중괄호 생략 가능
    fun checkPasswordMessage(){}  // 번호를 체크 하는 메소드
}
MainActivity(Controller)를 만들어줍니다. ViewInterface를 구현합니다.
MainActivity
class MainActivity : AppCompatActivity(), ViewInterface {
    lateinit var binding: ActivityMainBinding
    var presenter = Presenter(this)	// Presenter 클래스에 MainActivity를 파라미터로 넘겨주기
    override fun onCreate(savedInstanceState: Bundle?) {
        super.onCreate(savedInstanceState)
        binding = DataBindingUtil.setContentView(this, R.layout.activity_main)
        binding.activity = this
    }

    fun clickNumber(i : Int) {
        presenter.clickNumber(i)
    }

    // 인터페이스 함수를 오버라이드하여 MainActivity에서 작성
    override fun toastMessage(i: Int) {
        Toast.makeText(this,"$i 번을 클릭했습니다.", Toast.LENGTH_SHORT).show()
    }

    override fun checkPasswordMessage() {
        binding.messageSuccess.visibility = View.VISIBLE
    }
}
MainActivity는 입력만 받고 모든 권한은 Presenter에게 넘겨 줍니다.
Presenter 클래스를 만들어 줍니다.
Presenter
class Presenter(var viewInterface: ViewInterface) {
// class 인자에 var viewInterface: ViewInterface를 써주면 인자로 넘어 오는 ViewInterface값을 받아서 바로 초기화 가능(생성자기능)
// viewInterface 변수를 필드 처럼 사용 가능

    var model = Model()  // Presenter 클래스에서 model을 생성하여 가지고 있는다

    // class Presenter 인자 값으로 받았기 때문에 아래 4줄 생략 가능 (코틀린기능)
//    var viewInterface : ViewInterface? = null
//    constructor(viewInterface : ViewInterface) {
//        this.viewInterface = viewInterface
//    }

    // Presenter가 activity를 상속받고 있지 않기 때문에 view를 제어 못함 ex) toast나 visibility사용 불가
    // interface를 사용하여 activity를 상속받고 있는 MainActivity에서 interface 오버라이드된 메소드를 사용한다.
    fun clickNumber(i : Int){
        viewInterface.toastMessage(i)
        model.inputPassword(i)

        if(model.password.size == 4 && model.checkPassword()){
            viewInterface.checkPasswordMessage()
        }
    }
}
MVP특징처럼 Presenter에서 Model과 View를 가지고 있습니다. Model은 객체를 생성하였고 view는 MainActivity로 부터 this로 전달 받았습니다.
Model
class Model {
    var password : MutableList<Int> = mutableListOf()

    fun resetArray(){
        password.clear()
    }
    fun inputPassword(i : Int){
        if(password.size < 4){
            password.add(i)
        }
    }
    fun checkPassword() : Boolean{
        //SavePassword
        var trueCount = 0
        var savePassword = mutableListOf(1,2,3,4)

        for (i in 0 until savePassword.size){
            if(savePassword.get(i) == password.get(i)){
                trueCount++
            }
        }
        return trueCount == 4
    }
}
위의 그림 3에서 1,2,3,4 버튼을 차례로 누르면 MainActivity클래스에 있는 clickNumber() 클릭이벤트가 발생되면서 Presenter클래스의 clickNumber()가 호출됩니다. Presenter는 AppCompatActivity를 상속받지 못하여 view를 제어 하지 못하므로 MainActivity에 있는 인터페이스를 오버라이드한 함수를 호출하여 view를 제어 해줍니다.
참고자료 출처
'- 디자인 패턴' 카테고리의 다른 글
| MVVM패턴 이란? (0) | 2023.12.10 |
|---|---|
| MVC 패턴이란? (0) | 2023.06.21 |